Update 2015: Since writing these tips Lightroom CC (6) has been realised and I am happy to say all the tips below still work in Lightroom 5. The next two paragraphs might not be that relevant anymore so to get to the tips just click here.
Lightroom is Adobe’s flagship photo processing and organizing tool which celebrated its 5th birthday in February 2012 (I am a little late in posting this!). What better way can there be to celebrate this other than giving you my five top Lightroom tips? I started using it when it was version 1 with a G4 Power Book in April 2007. Its use is widespread amongst photographers now and I know fewer and fewer people using alternatives. I for one can’t image working without it. I don’t start up Photoshop anymore unless I want to combine two or more images or move things around in an image.
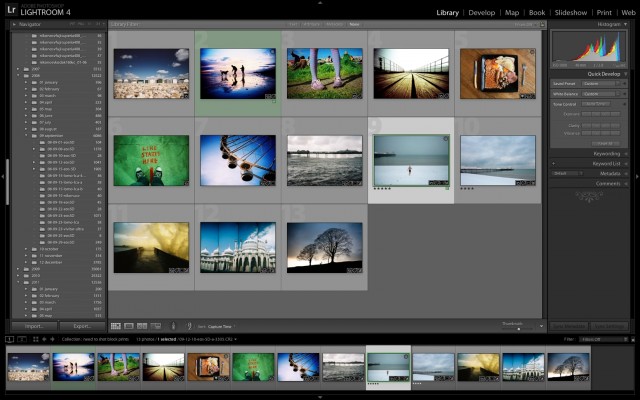
Lightroom 4 was released in March 2012 and one of the hottest features was the price drop. It’s now just £99 for the full version and £59 for the upgrade. I am pretty sure that when I got version 1 it was £250 or more. It’s one of the only things I really try and push on people that take my photography course is to get this software as it will make you life so much easier.
The tips
The following tips are not really for a new user, these tips are for features that you maybe would not of discovered just by having a little play with the application, but at the same time once you know them you won’t know how you lived without them. If you have any killer Lightroom tips please drop them in the comments below as this could give me fodder for a follow up post; I would of course credit you if I used your tip. So read on if you want the low down on: Split toning, Target adjustment tool, Solo mode, Rejecting & Brush resizing.
Solo mode
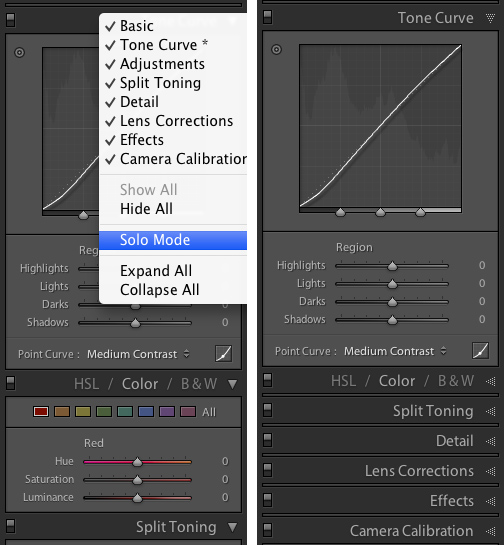
Whatever you’re doing in Lightroom there are always palettes stacked up on top of each other on the left and right sides of the screen. Sometimes it can be a little time consuming trying to find what you want as you have to scroll though the palettes; you can of course collapse the ones you don’t want but the best thing to do is turn on solo mode. If you right click / control click on any of the palette headings, then click “solo mode” all the palettes will collapse apart from the one you clicked on. If you now open a palette then click on another the open one will close, so you only ever have one open at anytime. It means you rarely have to scroll and you can get to what you want a lot faster.
Target adjustment tool
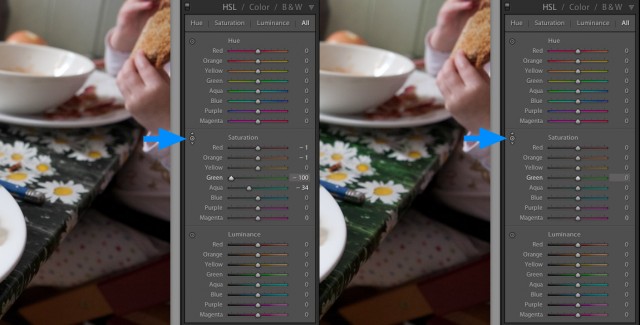
This is a great one and is not immediately obvious. You may have noticed the hue, saturation, luminance and tone curve tools have a little dot in the upper left corner of the palette. Clicking on it does not appear to do much unless you click and drag on the image. In the example below I have used it to affect the green of the table cloth to desaturate it. Doing it this way is a lot easier because I would have had to drag the green and aqua sliders to make the change, but with target adjustment it takes seconds to subtly change and image (not so subtle in this case!)
Split toning
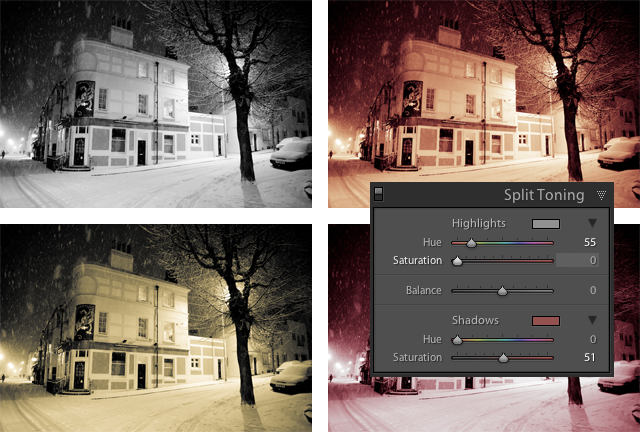
Split toning is something that I really did not get until some showed it to me. All it does is add a tone to the highlights and / or shadows of an image, so for instance you could make the shadows of your image red and highlights yellow. A subtle example of its use would be if a sky in an image feels a little cold, you can add red to low lights to warm it up a little. Different colours can be added to the highlights and shadows, and saturation sliders change the intensity of the effect and the balance between your highlight and shadow colours. You’re best off playing around with it to see what it does but its effect is most obvious on black and white images.
Brush resizing
When using any of the brush tools you can resize them without having to go back to the palette to do it. Simply scroll the scroll wheel on your mouse up and down to resize the brush. If you have a Mac laptop two finger vertical scrolling will do the same.
Delete in Lightroom, not on your camera
When it comes to digital photography you can get a little trigger happy and there’s a temptation if you’ve just taken a sequence of shots to do a little ad hock edit by deleting photos in camera. The problem with this is you’re distracting yourself from what is going on around you and you might miss a shot; plus judging images on a tiny screen with distractions like the glare of the sun is not the best way to view photographs.

Far better to judge once you’ve imported images to a computer where they can be viewed on a larger screen. At first, instead of deleting images, I set their “flag” to rejected – this is a bit like a pre-delete. Go through your images in the library module and when you are sure you want to delete one press the X key, if want to un-reject an image press the U key. Once you’ve finished rejecting images press Cmd + Delete to ‘fully’ delete the rejected images.
My Lightroom wish list
To finish I have to say I really love Lightroom but it’s not perfect yet! There are only two things that I would really want to see in the new Lightroom: better Flickr integration, and facial recognition.
Facial recognition would be great. When you imported a photo of someone it would tag that image with their name, or give you the option of creating a new name tag if Lightroom did not recognize them – much like how Facebook and iPhoto does.
Better Flickr integration would also be a plus. Lightroom has a nasty habit of uploading an image’s meta data over what you might have edited online so if you have added / changed titles or descriptions these could suddenly disappear on Flickr if things have changed in Lightroom. For this reason I stopped using Lightroom’s Flickr integration a long time ago and unfortunately Lightroom 4 is just as bad.
Update January 2014. Since writing these tips I have written quite a bit more on Lightroom. If you liked this post you might also like my other Lightroom posts.
Jeffrey Friedl’s jfFlickr is an improvement over Adobe’s own plugin. See http://regex.info/blog/lightroom-goodies.
I have used Jeffrey Friedl’s plug-in before Lightroom instigated it’s own Flickr integration in version 3 (I am pretty sure it was version 3 that Lightroom did it’s own flickr integration). It’s good plugin that works but I found the user interface a bit messy with to many options, that said it never deleted meta data from Flickr like the official Lightroom version did. I only ever upload one image at a time so I don’t really need this feature. I would recommend jfFlickr to people who what to upload lots of images at a time.
Enjoyed your article.
Very useful Kevin .. thank you… will look forward to more tips as and when you have the time..
nice blog post Kev, i even picked up the tip about solo mode. been using LR since 2007 as well. so thanks for that!
Solo Mode is a little gem! You need to get your self over to https://en.gravatar.com/ so you have an Avatar when you comment on WordPress blogs.
Great tips. I’d really love to see how you handle organizing your film scans. Digital is easy enough as all the metadata is included with the file. Do you do anything different for your scanned film?
Organising the library was going to one of these tips but I realised that it was not going to be short enough to be a list of five. I am currently now writing a blog post about organisation of the library which includes film tips, it’s currently at 1700 words. Expect it in the next two weeks.
Been using lightroom all these years and i hadnt spotted the target adjustment tool, very handy, great tip!
Thank you Kev, this has been most helpful
hi its grt and kep it up.
Do you know the alt-key with the sliders Shadow and Highlights?
I have noticed that holding down the Alt dose change functionality with other sliders and palates. Thanks for the hot tip.
the alt key work in many different ways in lightroom. I command you poke around Lightroom pressing the Alt key and see what changes (ie: dev, library etc….
It’s a great time saver.
The Alt key is a killer tip. I actually have notes for 7 new tips for new Lightroom tips post as this one is a little old now. Using the Alt key is actually at the top of the list.
Don’t forget shift+f! For two levels of fullscreen, at first lightroom does not appear to have dedicated fullscreen button (at least on a mac anyways) but with shift+f you’re finally able to get ligtroom to take up your full desktop acreage! (Tell me i’m not the only one who failed to realise you could do this for months after beginning to use lightroom.~)
In Lightroom 4 and below that was just the F key, you have to hold down SHIFT + F with Lightroom 5. I kept forgetting this as it’s only something you really need to do once. Till now every time my Lightroom had accidentally come out of fullscreen mode I would have to hunt around the menues menus to set it back.
I would like to be able to publish to Google+ directly from Lightroom.
Lightroom can export to Facebook, Flickr and others out of the box but you can add services though plugins. I don’t personally export for Google+ from Lightroom but I did a quick Google search on Google+ Lightroom export plug and there seems to be quite a lot.
Another handy shortcut with the brush tool is scrolling the mouse wheel while holding the shift key changes the feathering size.
That’s a new one as feathering was only introduced to the heal bush in Lightroom 5. Worth mentioning that just scrolling the mouse wheel changes the brush size. I use a Wacom Tablet, I find myself using the tablet pen in one hand and I use my other hand to change the brush size with the mouse.
Good stuff.